How to Set Up Apple Screen Time
Every Screen Time setting worth turning on, in order, plus the workarounds kids actually use and how to close each one.
 By GuestSpy Editor · Founder and editorPublished September 10, 2026Updated September 14, 202610 min read
Apple Screen Time is free, it’s already on every iPhone, and it does more than most parents realise — but it’s spread across half a dozen sub-menus with names that don’t obviously map to what they do. This is the walkthrough that puts it in the right order.
We’ll set up Apple Screen Time from a cold start: turning it on, choosing a passcode that actually holds, setting Downtime and App Limits, locking down content with Content & Privacy Restrictions, adding Communication Limits and Communication Safety, and linking it to Family Sharing so purchases need your approval. At the end there’s a table of the workarounds kids genuinely use against Screen Time and the exact setting that closes each one — because half the value of this guide is knowing what doesn’t work yet.
- The full Screen Time menu, at a glance
- Step 1: Turn it on and set the passcode
- Step 2: Downtime
- Step 3: App Limits
- Step 4: Communication Limits and Safety
- Step 5: Content & Privacy Restrictions
- Step 6: Locking the exits
- Step 7: Family Sharing and Ask to Buy
- Workarounds kids actually use
- Questions parents actually ask
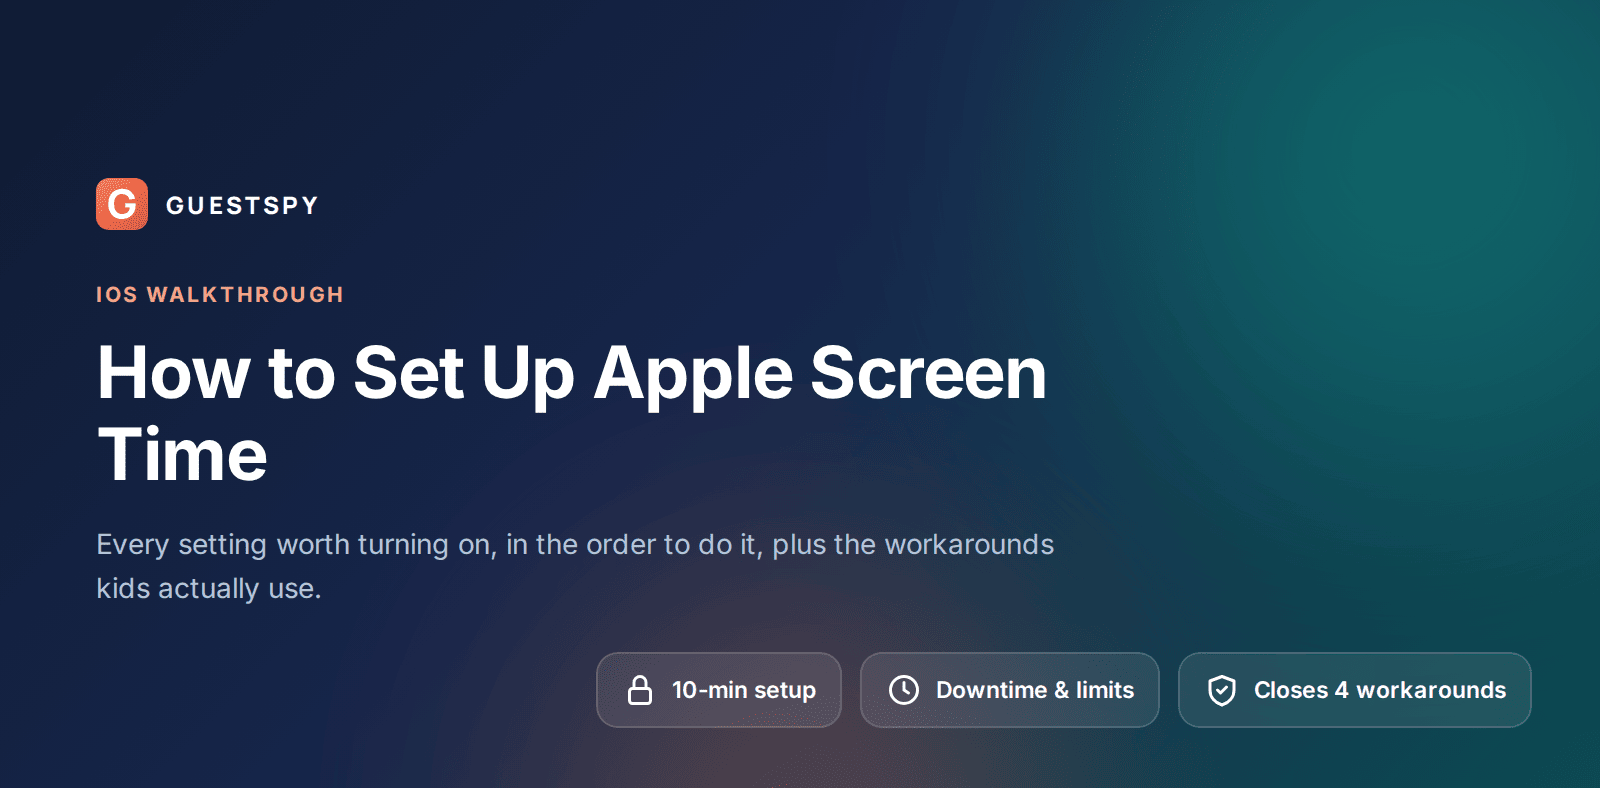
The full Screen Time menu, at a glance
Everything in this guide lives inside Settings → Screen Time on the child’s iPhone, with one exception — Family Sharing and Ask to Buy, which live in the Family Sharing menu but work alongside Screen Time. Doing all of this on the child’s own phone, with them present, takes about fifteen minutes end to end and should be treated as an open conversation, not something done while they’re at school.
Step 1: Turn it on and set the passcode
Screen Time is off by default on a new or reset iPhone. Turning it on takes under a minute, but the passcode you choose in this step decides whether anything downstream actually holds.
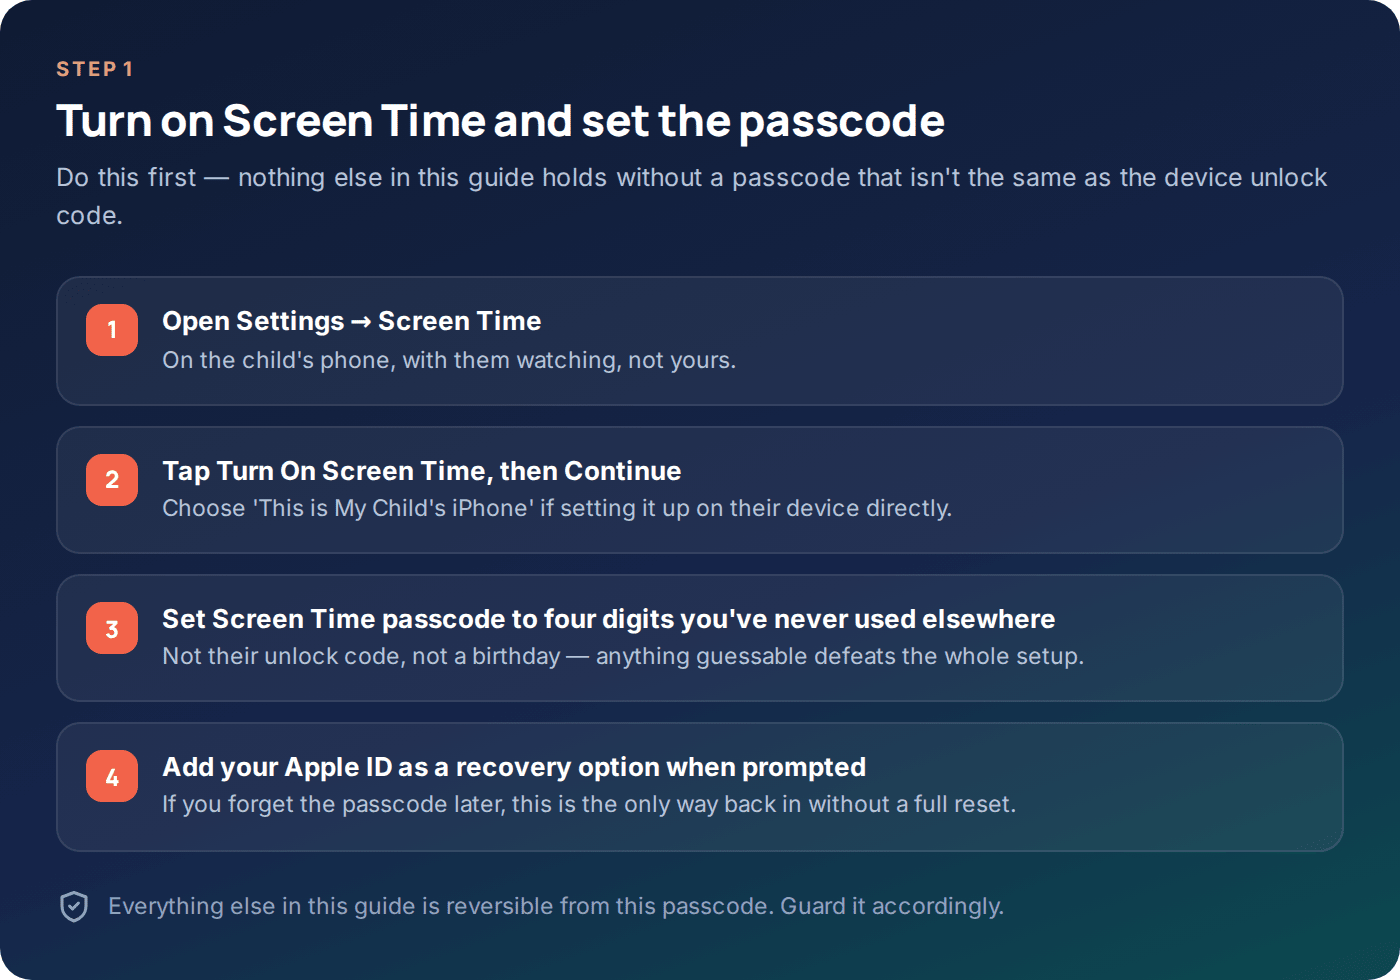
- Open Settings → Screen Time → Turn On Screen Time → Continue.
- Choose “This is My Child’s iPhone.” This unlocks the full set of restriction options rather than the lighter self-management version.
- Set a four-digit Screen Time passcode that is not the device unlock code. Children who know your unlock code — and most do — will try it here first. Pick something separate.
- Add your Apple ID for passcode recovery when asked. Skip this and a forgotten passcode means a full device reset to regain control.
Step 2: Downtime
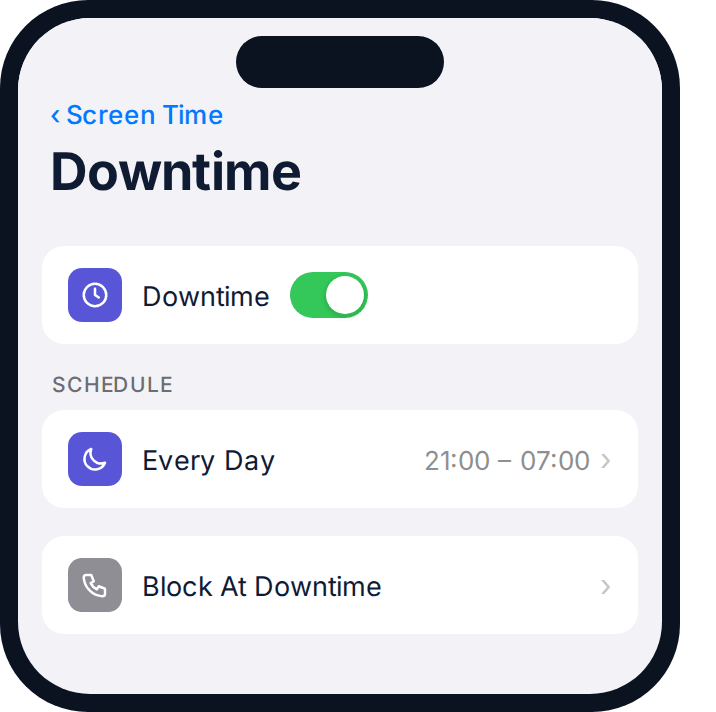
Downtime is a scheduled window — typically overnight — when only apps you’ve explicitly allowed will open. It is the single highest-value setting in Screen Time: it directly protects sleep, and unlike an app limit it can’t be dodged by switching to a different app in the same category.
- Screen Time → Downtime → toggle on.
- Set “Every Day” or customise per day of the week. A common pattern is 21:00–07:00 on school nights, an hour later at weekends.
- Screen Time → Always Allowed → choose which apps ignore Downtime entirely. Phone and Messages are sensible defaults; deliberately leave games and social apps off this list, or Downtime does nothing.
During Downtime, blocked apps show a small hourglass icon instead of opening, and the child can tap “Ask For More Time,” which sends a request to your phone rather than silently failing. That request-and-approve loop is worth knowing about — it’s the built-in negotiation valve, and it’s usually better to let a reasonable request through occasionally than to hold an absolute line every single night.
One detail that trips up a lot of parents on their first attempt: Downtime applies across every device signed into that Apple ID, not just the phone. If your child also has an iPad or a Mac on the same account, the schedule follows them there too, which is usually what you want but occasionally causes confusion when a school laptop locks itself at bedtime as well.
Step 3: App Limits
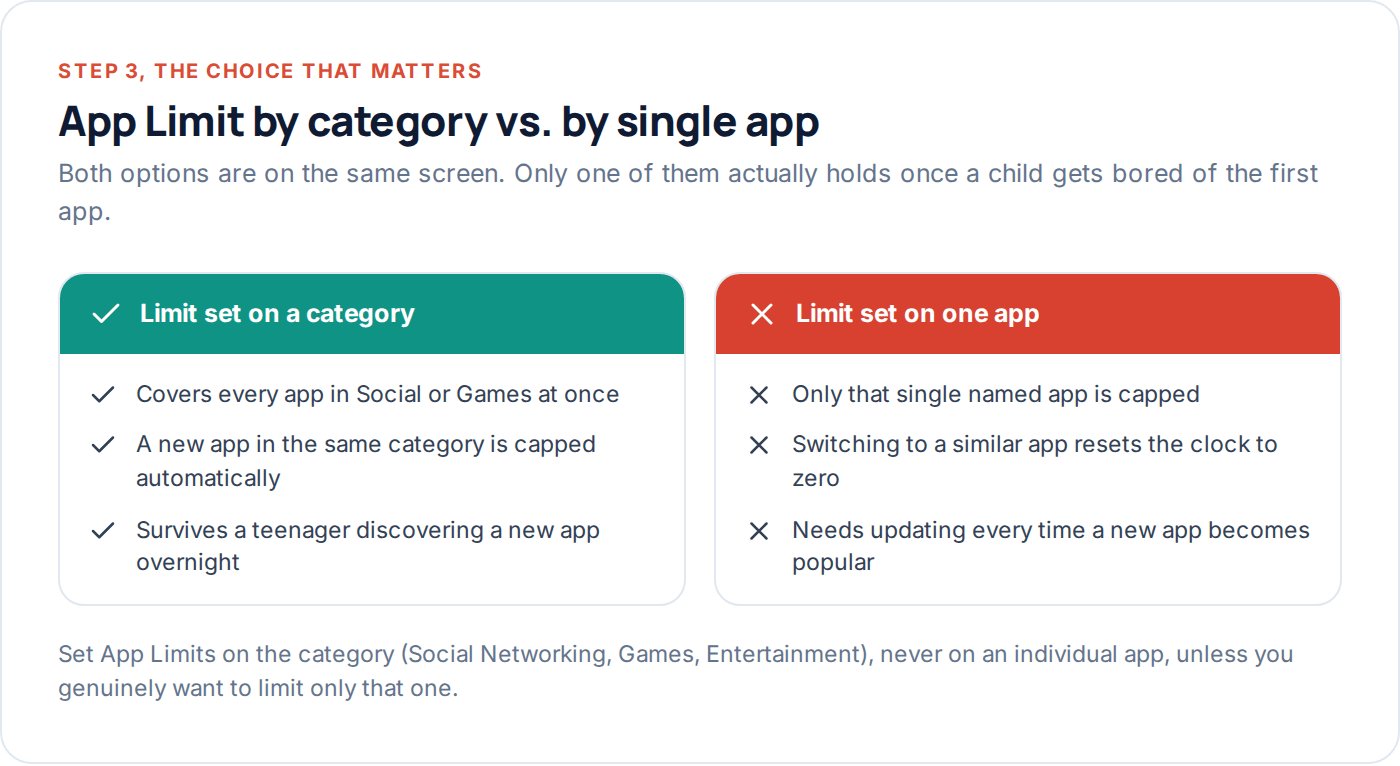
App Limits cap daily time on a chosen category or individual app, and the choice between category and individual app matters more than it looks. A limit on “Instagram” alone does nothing once a child opens TikTok instead. A limit on the “Social Networking” category follows them across every app in it.
- Screen Time → App Limits → Add Limit.
- Select a category — Social Networking, Games, Entertainment — rather than a single app.
- Set the daily time and, optionally, different limits per day of the week.
- Turn on “Block at End of Limit” if you want it enforced strictly, or leave it off to allow a one-tap “ignore limit for today,” which some families use deliberately as a pressure release.
A common early mistake is setting too many categories at once — five or six separate limits on day one, each with a slightly different daily allowance, which nobody in the house can actually remember. Start with one, usually Social Networking or Games depending on what’s dominating screen time, and add a second only once the first is genuinely bedded in.
Step 4: Communication Limits and Communication Safety
Two separate, easily confused settings live near each other. Communication Limits restricts who can call or message the child during screen time and Downtime — useful for younger children, often too blunt for a teenager who is legitimately coordinating a group project or a bus timetable with friends. Communication Safety is different: it scans photos in Messages (and a few other apps) on the device itself for nudity and warns the child before viewing or sending, without sending anything to Apple or to you. It’s worth turning on regardless of age.
- Screen Time → Communication Limits → During Screen Time → choose Everyone, Contacts Only, or specific contacts.
- Set a separate, usually stricter, list for During Downtime. Many families allow parents and emergency contacts only overnight.
- Settings → Screen Time → Communication Safety → turn on for your child’s account. This works independently of the limits above and needs no separate configuration once enabled.
Step 5: Content & Privacy Restrictions
This is the broadest menu in Screen Time and the one most likely to be skipped because its name doesn’t obviously say “content filter.” It covers web content, app age ratings, Siri search results, and a long list of privacy toggles.
- Screen Time → Content & Privacy Restrictions → toggle on.
- Content Restrictions → Web Content → Limit Adult Websites. Apple maintains this list automatically; it isn’t perfect, but it removes accidental encounters, which is the majority of what happens at younger ages.
- Content Restrictions → Apps → set an age rating ceiling matching what you consider appropriate — this also governs what shows up in App Store search results.
- Content Restrictions → Siri → Explicit Language and Web Search Content → set to Don’t Allow if you want Siri’s own filter engaged too.
| Screen Time section | What it actually controls | What it does not touch |
|---|---|---|
| Downtime | Which apps can open, by time of day | What happens inside an allowed app |
| App Limits | Total daily minutes per category or app | Who the child is talking to inside that app |
| Communication Limits | Who can call or message during set hours | The content of any message sent |
| Content & Privacy Restrictions | Web content, app ratings, purchases, account changes | Anything happening inside an already-installed, allowed app |
Read across that table before assuming Screen Time covers a specific worry. It is very good at time and access. It has almost nothing to say about what happens inside an app it has already allowed — that gap is what a monitoring app is built to cover, not a Screen Time failing as such.
Step 6: Locking the exits
This is the step that separates a Screen Time setup that holds from one that quietly stops working within a fortnight. Everything above can, on its own, be undone by a child who knows roughly how iPhones work — unless these specific toggles are also set.
- Content & Privacy Restrictions → iTunes & App Store Purchases → Deleting Apps → Require Passcode. Closes the “delete and reinstall to reset a timer” workaround directly.
- Content & Privacy Restrictions → Allow Changes → Account Changes → Don’t Allow. Stops the Apple ID being removed from the phone, which would take it out of Family Sharing and disable Screen Time’s remote link entirely.
- Allow Changes → Cellular Data Changes → Don’t Allow. Prevents mobile data being switched off Wi-Fi specifically to dodge a network-level filter you may also be running.
- Safari → Don’t Allow Private Browsing (found under the app-specific restriction list), which stops a content filter being sidestepped in a private tab.
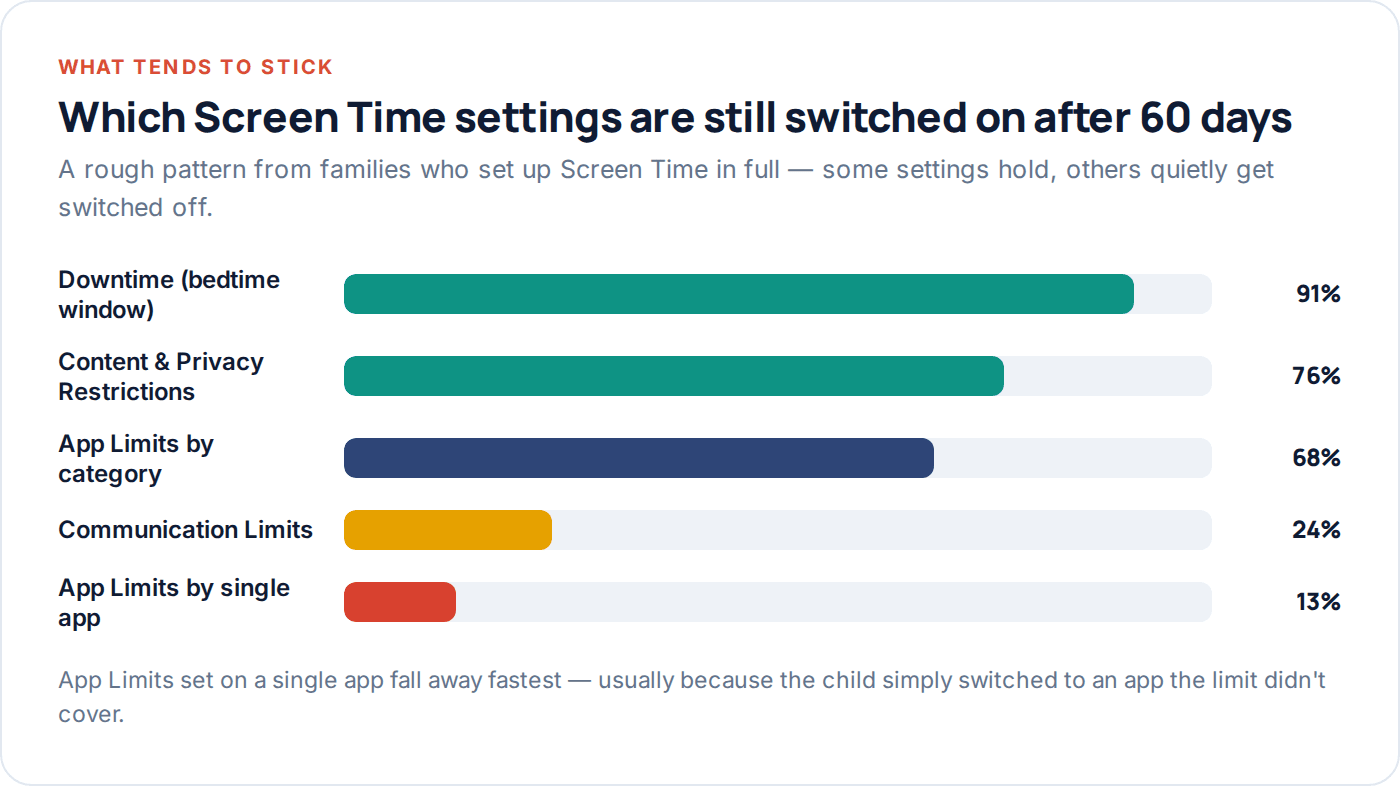
Locking these four toggles is what decides whether the numbers below hold up over time, rather than quietly drifting back to nothing.
Step 7: Family Sharing and Ask to Buy
Family Sharing is a separate menu from Screen Time, but the two work together, and it’s what lets you manage a child’s Screen Time limits remotely, from your own phone, rather than only on theirs.
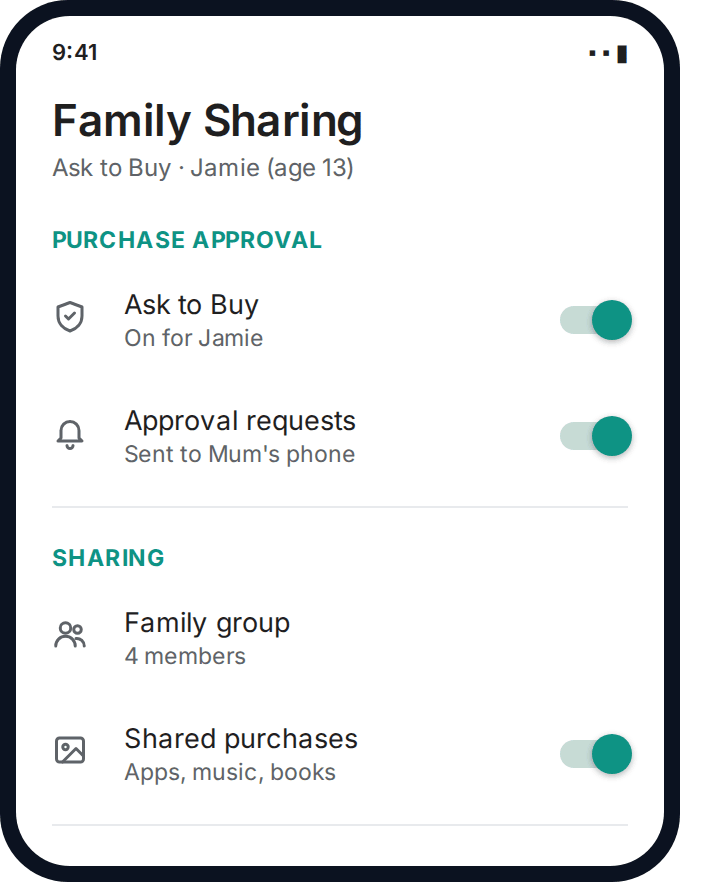
- Settings → [Your Name] → Family Sharing → set up or open your existing family group.
- Add your child with their own Apple ID. A child under the account age threshold for your country gets one created for them automatically through this flow.
- Turn on Ask to Buy for their account. Every purchase, free download and subscription now sends an approval request to a parent’s device before it completes.
- From your own phone, open Screen Time and select your child’s name to view and adjust their limits without needing to hold their phone.
Workarounds kids actually use
None of the above is airtight against a determined, technically confident teenager, and it’s worth being honest about that rather than pretending Screen Time is unbreakable. Here’s what actually gets tried, and which setting from the steps above closes it.
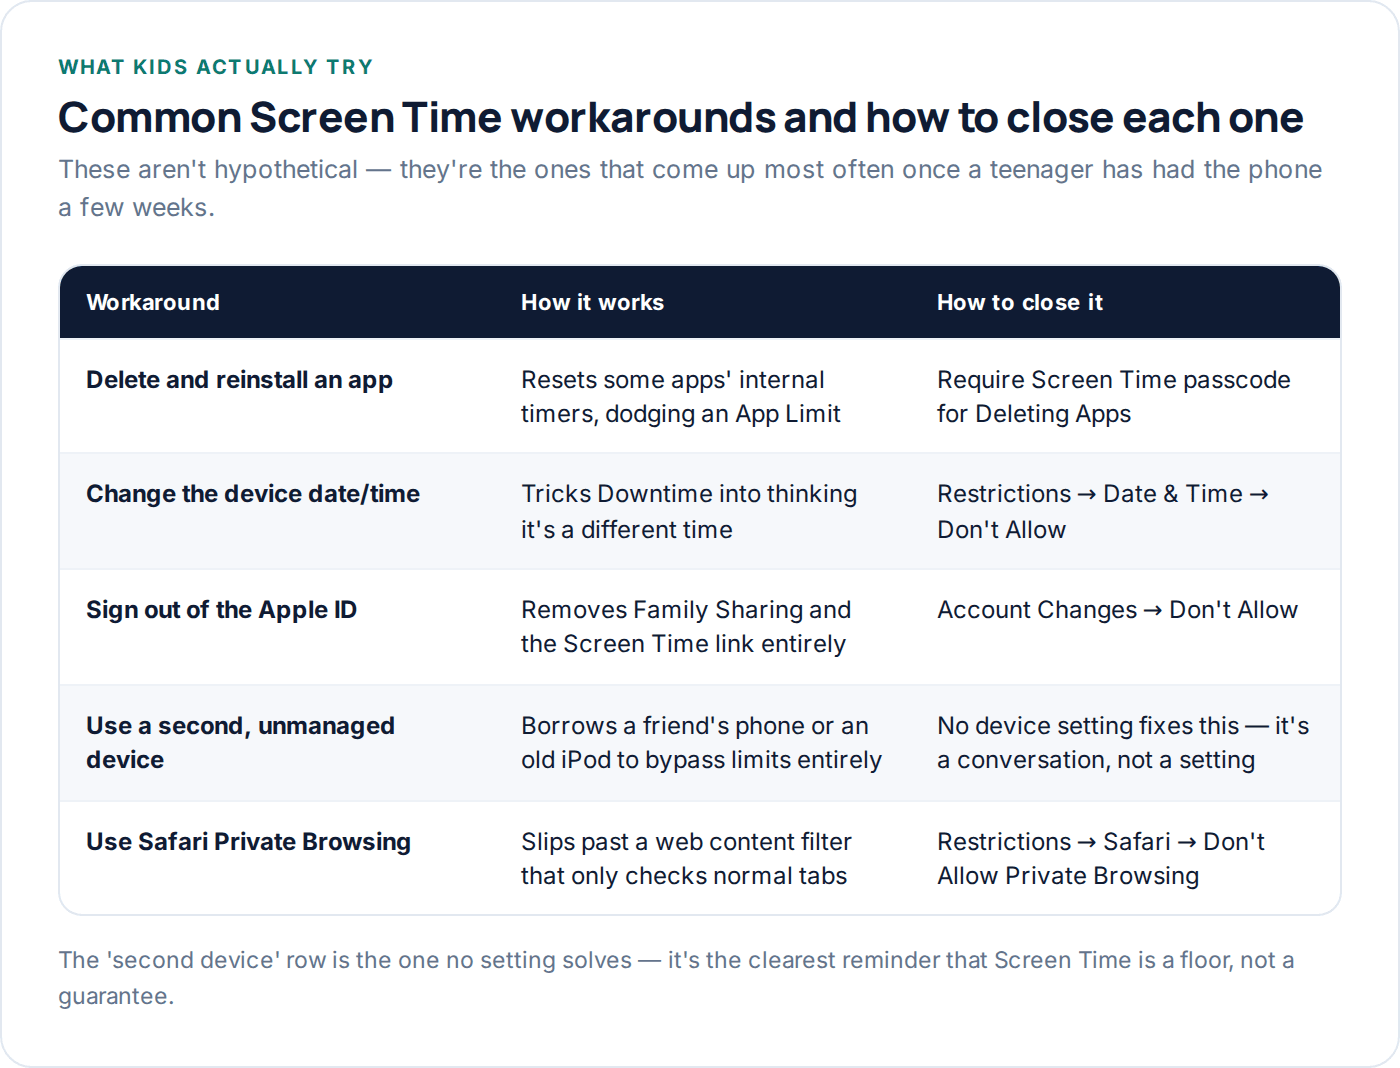
The last row in that image matters more than any single toggle. Screen Time governs one device. It has no idea an old iPod or a friend’s phone exists, and no amount of configuration changes that. It’s the clearest evidence that device settings are a floor, not a complete answer — worth pairing with an honest conversation about why the rules exist in the first place, and, where relevant, with our location sharing or message alert features for the parts a single device’s settings simply can’t see.
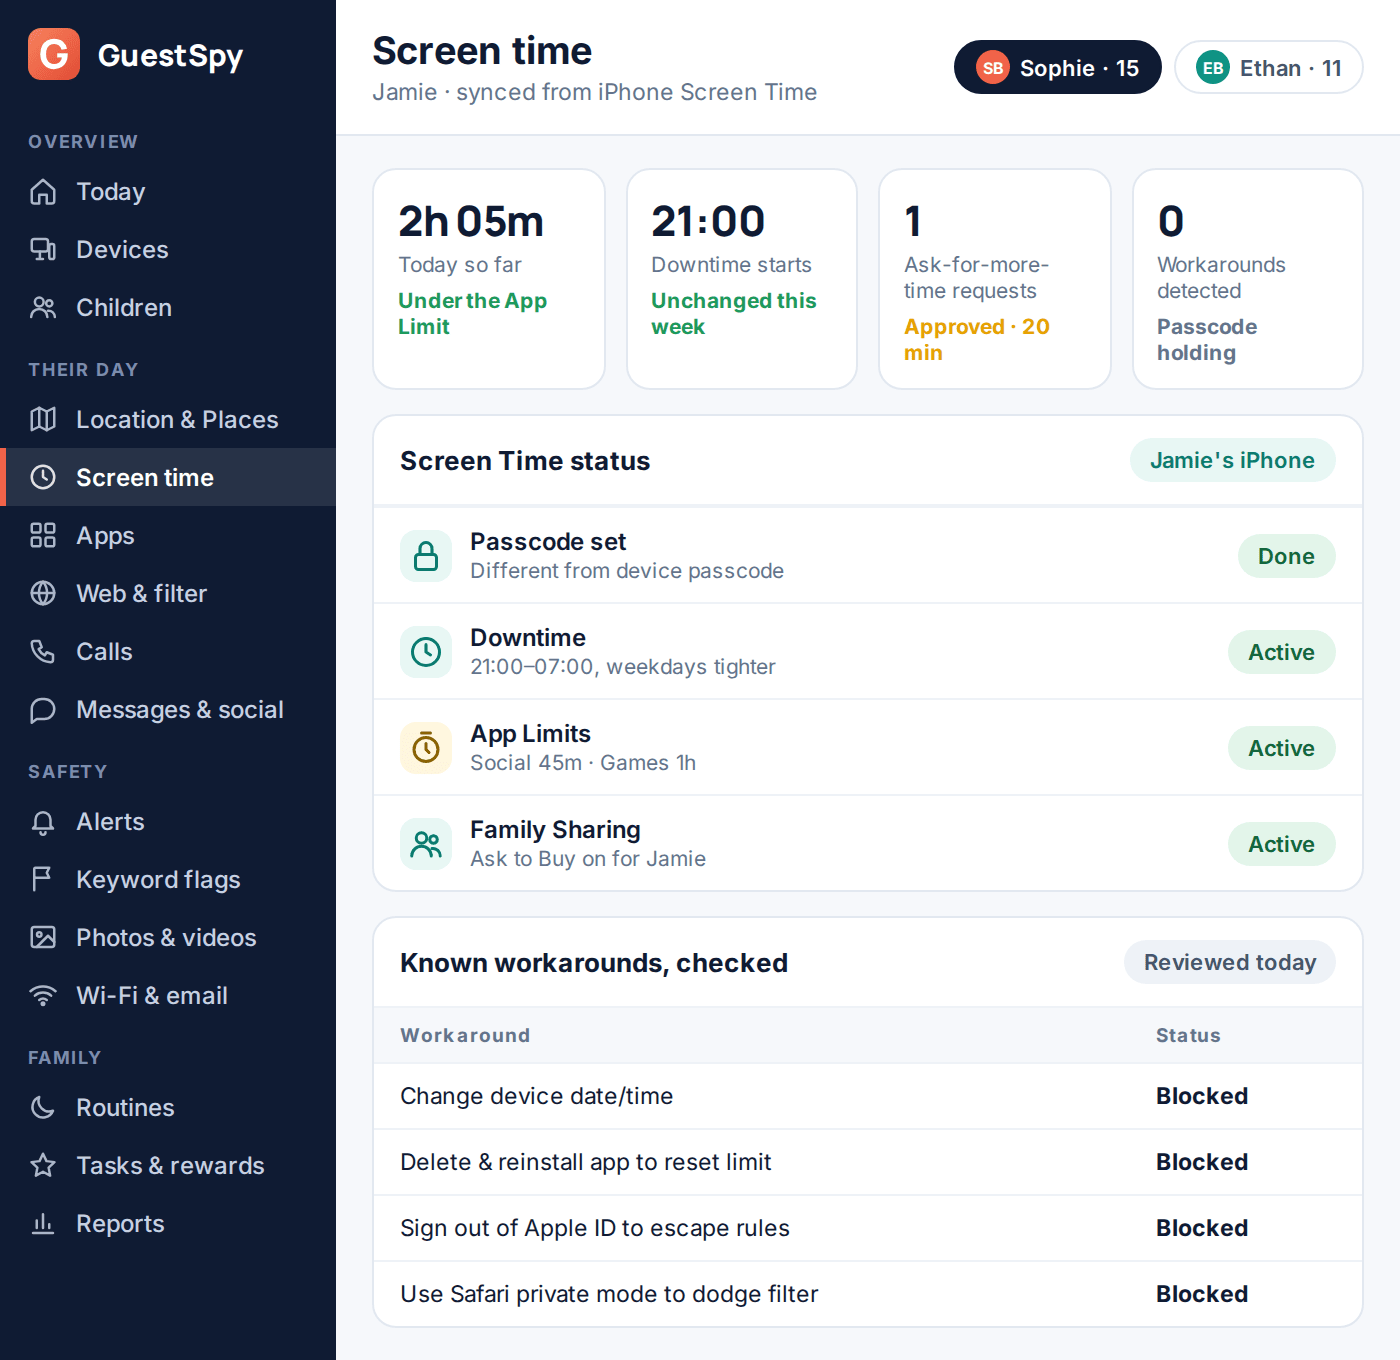
Once Screen Time is holding, some parents want one view across it and the parts it doesn’t cover — who’s calling, where the phone is, an alert on a risky word. That’s the point a combined dashboard earns its place rather than replaces anything above. Below is what that looks like in practice: the same Downtime schedule and App Limit you just set, alongside the questions Screen Time was never built to answer.
Questions parents actually ask
Can Screen Time show me the content of my child’s texts?
No. Screen Time reports app usage time and, through Communication Limits, who was contacted — not message content. iOS deliberately prevents one app, including Apple’s own settings, from reading another app’s message content, and that isn’t something Screen Time is designed to change.
What happens if I forget the Screen Time passcode?
If you added your Apple ID during setup, you can reset it via “Forgot Passcode?” using Face ID or Touch ID and your Apple ID password. Without that recovery option set up in advance, the only route back is erasing the device, which removes everything on it.
Does Screen Time work if my child is on someone else’s Wi-Fi or mobile data?
Yes — Downtime, App Limits and Content Restrictions are enforced on the device itself, not the network, so they apply anywhere the phone has power, on any connection.
Can my teenager just turn Screen Time off themselves?
Not without the Screen Time passcode, provided Account Changes is set to Don’t Allow as described in Step 6. Without that lock, a savvy teenager can remove the whole configuration in a couple of taps.
Is there a way to see a report of what they’ve actually used?
Yes — Screen Time → See All Activity shows a breakdown by app and category, both daily and weekly, and it’s viewable from a linked parent’s phone through Family Sharing without needing the child’s device in hand.
Should I use Screen Time instead of a monitoring app, or alongside one?
Alongside, for most families. Screen Time is free and handles bedtime, app limits and content filtering natively. A monitoring app like GuestSpy adds what Screen Time doesn’t attempt — location alerts, who’s calling, and flags on risky messages — without duplicating what’s already working.
Where to go from here
Fifteen minutes with the steps above covers the large majority of what an iPhone can do natively, for free. If you get to the end and still have a specific gap — location, who’s calling, message alerts — that’s exactly the point where GuestSpy is designed to sit alongside Screen Time rather than replace it, and setup takes about two minutes once Screen Time itself is in place.
Using a monitoring app for this? GuestSpy is parental monitoring for Android that stays visible on the child's phone and runs from any browser. If it fits your family, see the Screen time & budgets feature.
Related guides
How to Talk to Your Kid About Screen Time
The conversation decides whether a screen time rule holds or gets fought over daily. Scripts by age, how to involve…
How to Block Adult Websites on Every Device at Home
No single setting blocks adult content everywhere. Here's the layer-by-layer setup — device, DNS, router, browser, console and TV —…
How to Set App Time Limits That Actually Stick
Category limits beat per-app limits, warnings beat sudden cut-offs, and a limit set without a conversation gets bypassed within a…
Monitoring your child can see.
Location, screen-time budgets, routines, app and website blocking and the alerts that matter, run from any browser and visible on the phone. Pair an Android phone in about fifteen minutes.